
Setting up file sharing services on Ubuntu Server is an essential task in modern IT environments, enabling seamless collaboration and efficient data exchange across devices, operating systems, and users. Whether you’re working in a mixed environment with Linux, Windows, and macOS systems or supporting a team that requires centralized access to shared resources, Ubuntu Server provides powerful tools to meet your file-sharing needs.
In this guide, we’ll walk you through the process of setting up three popular file-sharing services—FTP, Samba, and NFS—on Ubuntu Server. These services are designed to facilitate secure and reliable file sharing, ensuring compatibility across diverse platforms and environments.
Previous articles:
01. Introduction to Ubuntu Server – SysOSX: AI & Cloud
02. How to Setup Your First Ubuntu Server: A Beginner’s Guide – SysOSX: AI & Cloud
03.Mastering the Linux Command Line for Ubuntu Server – SysOSX: AI & Cloud
04. Managing Users and Permissions on Ubuntu Server: A Comprehensive Guide – SysOSX: AI & Cloud
05. Networking Basics for Ubuntu Server: A Comprehensive Guide – SysOSX: AI & Cloud
06. Installing and Managing Software on Ubuntu Server: A Complete Guide – SysOSX: AI & Cloud
07.Patching and Updating Ubuntu Server: A Comprehensive Guide – SysOSX: AI & Cloud
08. Securing Your Ubuntu Server: Practical Steps for Hardening and Protection – SysOSX: AI & Cloud
09. Ubuntu server auditing and logging
10. System Monitoring Tools for Ubuntu Server: A Comprehensive Guide – SysOSX: AI & Cloud
11. Centralized Logging for ubuntu server: a must read guide – SysOSX: AI & Cloud
12. Audit and Compliance for Ubuntu Server: Best Practices – SysOSX: AI & Cloud
14. Host Multiple Websites on a single Ubuntu Server: Useful tips – SysOSX: AI & Cloud
15. Managing Storage and Disks on Ubuntu Server: Simple Guide – SysOSX: AI & Cloud
Table of Contents
- Introduction to File Sharing Services
- Use Scenarios for FTP, Samba, and NFS
- Setting Up FTP
- Configuring Samba for Windows and Linux
- Setting Up NFS for Linux and macOS
- Troubleshooting Common Issues
- Additional Resources
Introduction to File Sharing Services
File sharing services allow devices to exchange data over a network. Ubuntu Server supports multiple protocols for sharing files, including:
- FTP (File Transfer Protocol): Ideal for transferring files between devices over a network.
- Samba: Enables file sharing between Linux and Windows systems using the SMB/CIFS protocol.
- NFS (Network File System): Designed for sharing files between Unix-based systems, including Linux and macOS.
Each protocol has its strengths, and the choice depends on your specific use case. Below, we’ll walk you through the setup process for each service.
Use Scenarios for FTP, Samba, and NFS
Understanding the use cases for each file-sharing protocol helps you choose the right one for your environment:
FTP Use Case
FTP is best suited for environments where files need to be transferred between devices over a network, such as:
- Hosting websites where clients upload files to a web server.
- Sharing files with external users who don’t need persistent access to a shared directory.
- Automating file uploads/downloads using scripts or cron jobs.
Samba Use Case
Samba is ideal for mixed environments with Linux and Windows systems. Common scenarios include:
- Sharing files between Linux servers and Windows desktops in corporate networks.
- Providing a shared folder for collaboration between users on different operating systems.
- Allowing Windows users to access Linux-based file servers seamlessly.
NFS Use Case
NFS is tailored for Unix-based systems like Linux and macOS. It works well in scenarios such as:
- Sharing files between Linux servers in a data center or cloud environment.
- Mounting directories on macOS systems for development purposes.
- Providing persistent, high-performance shared storage for applications running on Linux.
Setting Up FTP
FTP is a widely used protocol for transferring files between devices. To set up an FTP server on Ubuntu:
Step 1: Install vsftpd
Run the following command to install the vsftpd package:
sudo apt update
sudo apt install vsftpd
Step 2: Configure vsftpd
Edit the configuration file:
sudo nano /etc/vsftpd.conf
Make the following changes:
- Enable anonymous access (optional):
anonymous_enable=NO - Allow local users:
local_enable=YES write_enable=YES - Restrict users to their home directories:
chroot_local_user=YES - Make the Home Directory Non-Writable
sudo chmod a-w /home/yourusername
Save and close the file, then restart the FTP service:
sudo systemctl restart vsftpd
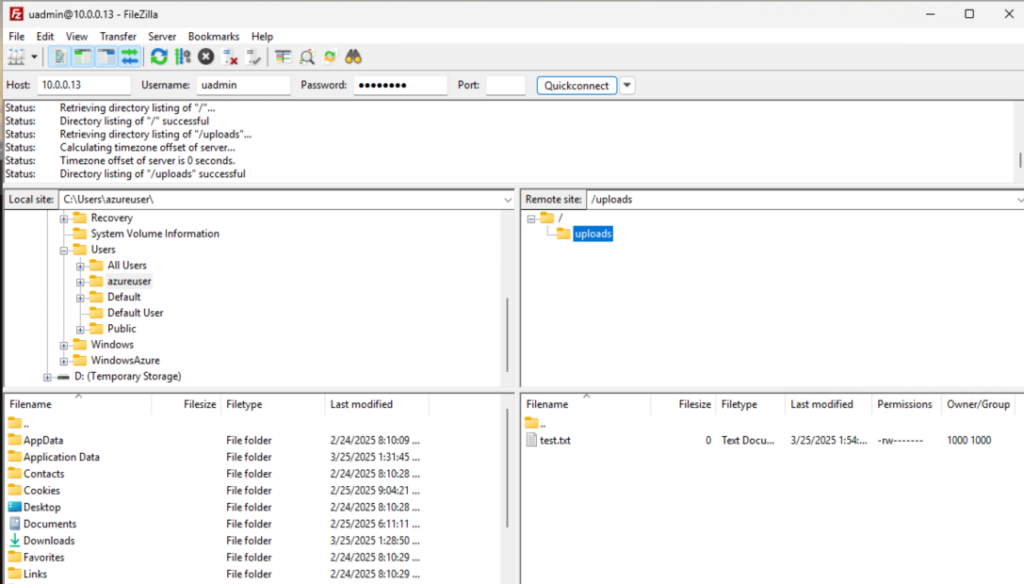
Step 3: Test the FTP Server
Use an FTP client (e.g., FileZilla) or the command line to connect to your server:
ftp <server-ip>
output:
PS C:\> ftp 10.0.0.13
Connected to 10.0.0.13.
220 (vsFTPd 3.0.5)
200 Always in UTF8 mode.
User (10.0.0.13:(none)): uadmin
331 Please specify the password.
Password:

230 Login successful.
ftp> ls
200 PORT command successful. Consider using PASV.
150 Here comes the directory listing.
uploads
226 Directory send OK.
ftp: 12 bytes received in 0.00Seconds 12000.00Kbytes/sec.
ftp> put test.txt
200 PORT command successful. Consider using PASV.
553 Could not create file.
ftp> cd uploads
250 Directory successfully changed.
ftp> pwd
257 "/uploads" is the current directory
ftp> put test.txt
200 PORT command successful. Consider using PASV.
150 Ok to send data.
226 Transfer complete.
ftp> ls
200 PORT command successful. Consider using PASV.
150 Here comes the directory listing.
test.txt
226 Directory send OK.
ftp: 13 bytes received in 0.00Seconds 13000.00Kbytes/sec.
ftp>
Configuring Samba for Windows and Linux
Samba is ideal for sharing files between Linux and Windows systems. Follow these steps to set up Samba:
Step 1: Install Samba
Run the following command:
sudo apt update
sudo apt install samba
Step 2: Configure Samba
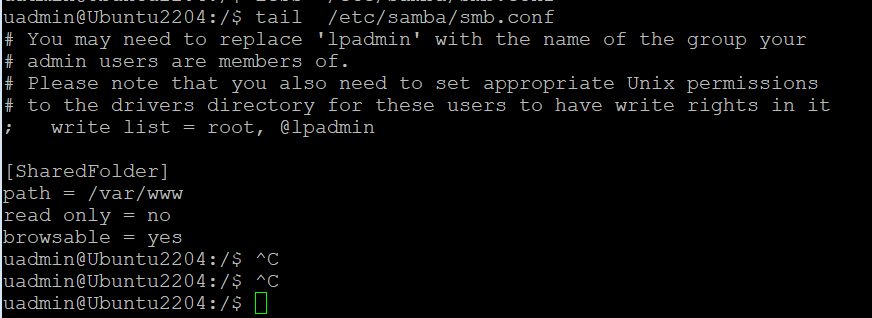
Edit the Samba configuration file:
sudo nano /etc/samba/smb.conf
Add the following section to share a directory:
[SharedFolder]
path = /path/to/shared/folder
read only = no
browsable = yes
guest ok = yes
force user = nobody
Step 3: Set Permissions
Ensure the shared folder has proper permissions:
sudo chmod -R 0777 /path/to/shared/folder
sudo chown -R nobody:nogroup /path/to/shared/folder
Restart the Samba service:
sudo systemctl restart smbd
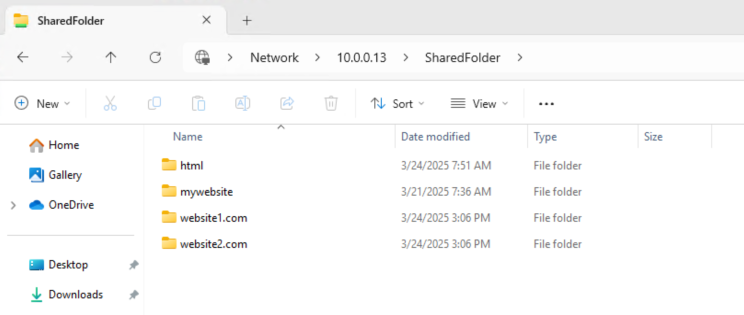
Step 4: Access Samba Shares
- Windows: Open File Explorer and enter the server’s IP address (e.g.,
\\<server-ip>). - Linux: Use the
smbclientcommand or mount the share usingcifs.
Setup SMB username and password by using:
sudo smbpasswd -a username
After I setup the samba server, add the smb username and password and share the /www/var, try access from the windows machine.
Setting Up NFS for Linux and macOS
NFS is a powerful protocol for sharing files between Unix-based systems. Here’s how to set up NFS:
Step 1: Install NFS Server
Run the following command:
sudo apt update
sudo apt install nfs-kernel-server
Step 2: Configure NFS Exports
Edit the NFS exports file:
sudo nano /etc/exports
Add the directory you want to share, specifying the client IPs or networks:
/path/to/shared/folder <client-ip>(rw,sync,no_subtree_check)
Then verify the exports using:
exportfs -v

Step 3: Apply Changes
Restart the NFS service:
sudo systemctl restart nfs-kernel-server
Step 4: Mount the NFS Share
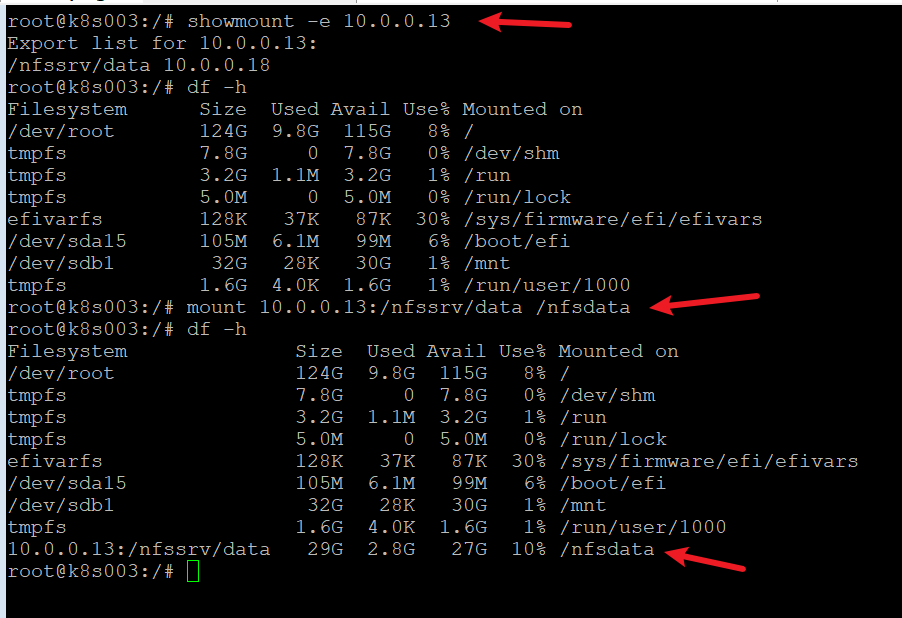
On the client machine, use the following command to mount the NFS share:
sudo mount <server-ip>:/path/to/shared/folder /mount/point
From client side, install the nfs client by using command line:
sudo apt install nfs-common

#Check if the NFS server is listening on the required ports:
sudo showmount -e nfs-server-ip
Troubleshooting Common Issues
File sharing services may encounter issues due to misconfigurations or network settings. Here are some common problems and solutions:
Firewall Configuration
Ensure the necessary ports are open:
- FTP: Port 21
- Samba: Ports 137-139 and 445
- NFS: Ports 2049 and others (check
/etc/servicesfor details)
Use ufw to allow these ports:
sudo ufw allow <port-number>
Permission Errors
Verify directory permissions and ownership for shared folders.
Connectivity Issues
Check network settings and ensure the server and client are on the same subnet.
Additional Resources
For further reading, consult the official documentation for each service:
Next Chapter: Advanced Topics
In the next chapter, we’ll dive into Advanced Topics to further enhance your server management skills. The first topic will focus on Setting Up a Secure Database Server on Ubuntu, where you’ll learn how to install and configure the database like mysql or mariadb on ubuntu server. Stay tuned!
3 thoughts on “16. Setting Up File Sharing Services on Ubuntu Server: a complete guide”