
Introduction
Managing storage and disks on Ubuntu Server is a critical skill for administrators, especially in dynamic environments like cloud platforms (AWS, Azure, Google Cloud) or virtualization platforms (VMware, Hyper-V, Proxmox). Tasks such as expanding OS disks, initializing data disks, or optimizing storage configurations are common scenarios. While automation tools often simplify these processes, having a solid understanding of the underlying steps is essential for effective troubleshooting and manual intervention.
In this guide, we’ll explore managing storage and disks on Ubuntu Server, including file system types, partitioning, formatting, and disk optimization. With practical examples tailored for both physical and virtualized environments, this guide will equip you with the knowledge to efficiently handle storage management tasks.
Previous articles:
01. Introduction to Ubuntu Server – SysOSX: AI & Cloud
02. How to Setup Your First Ubuntu Server: A Beginner’s Guide – SysOSX: AI & Cloud
03.Mastering the Linux Command Line for Ubuntu Server – SysOSX: AI & Cloud
04. Managing Users and Permissions on Ubuntu Server: A Comprehensive Guide – SysOSX: AI & Cloud
05. Networking Basics for Ubuntu Server: A Comprehensive Guide – SysOSX: AI & Cloud
06. Installing and Managing Software on Ubuntu Server: A Complete Guide – SysOSX: AI & Cloud
07.Patching and Updating Ubuntu Server: A Comprehensive Guide – SysOSX: AI & Cloud
08. Securing Your Ubuntu Server: Practical Steps for Hardening and Protection – SysOSX: AI & Cloud
09. Ubuntu server auditing and logging
10. System Monitoring Tools for Ubuntu Server: A Comprehensive Guide – SysOSX: AI & Cloud
11. Centralized Logging for ubuntu server: a must read guide – SysOSX: AI & Cloud
12. Audit and Compliance for Ubuntu Server: Best Practices – SysOSX: AI & Cloud
14. Host Multiple Websites on a single Ubuntu Server: Useful tips – SysOSX: AI & Cloud
Table of Contents
- Understanding File System Types
- Partitioning Disks on Ubuntu Server
- Formatting Data Disks on Ubuntu Server
- Persisting the Mount: Use UUID in Cloud Environments
- Cloud and Virtualization Scenarios: Disk Expansion and Initialization
- Monitoring and Optimizing Disk Usage
- References
Understanding File System Types
A file system defines how data is stored and accessed on a disk. Choosing the right file system is crucial for performance, reliability, and compatibility. Below are the most common file systems for Ubuntu servers:
Common File Systems for Ubuntu
- Ext4 (Fourth Extended File System)
- Default file system for Ubuntu servers.
- Features journaling, large file support, and excellent performance.
- Ideal for general-purpose workloads.
- Command to format:
sudo mkfs.ext4 /dev/sdX1
- XFS
- High-performance journaling file system designed for large files and high I/O workloads.
- Commonly used in enterprise and cloud environments.
- Command to format:
sudo mkfs.xfs /dev/sdX1
- Btrfs (B-Tree File System)
- Advanced file system offering snapshot support, data compression, and RAID capabilities.
- Suitable for complex workloads and environments requiring frequent backups.
- NTFS
- Used primarily for compatibility with Windows environments.
- Useful for dual-boot systems or shared disks between Linux and Windows.
- FAT32 and exFAT
- Lightweight file systems used for removable drives and cross-platform compatibility.
Choosing the Right File System
- Ext4: General-purpose workloads.
- XFS: High-performance workloads in enterprise or cloud environments.
- Btrfs: Advanced features like snapshots and compression.
- NTFS/FAT32: Cross-platform compatibility.
Partitioning Disks on Ubuntu Server
Partitioning divides a physical disk into logical sections, enabling better data organization and management. This is particularly useful for separating system files, backups, and application data.
Steps to Partition a Disk on Ubuntu Server
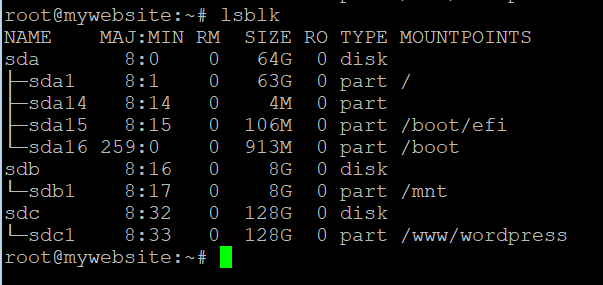
- Identify the Disk:
Use thelsblkcommand to list all available disks and their partitions:lsblk
- Create a Partition:
Usefdiskorpartedto create a new partition. Example usingfdisk:sudo fdisk /dev/sdX- Press
nto create a new partition. - Specify the partition size and type.
- Press
wto write changes to the disk.
- Press
- Verify the Partition:
Runlsblkagain to confirm the new partition has been created.
Formatting Data Disks on Ubuntu Server
Formatting prepares a partition for use by creating a file system.
Steps to Format a data Disk on Ubuntu Server
- Install Necessary Tools:
Ensure you have themkfsutility installed (included by default in most distributions). - Format the Partition:
Use themkfscommand to format the partition. Example:sudo mkfs.ext4 /dev/sdX1 - Create a Mount Point:
Important Note: In cloud environments, avoid using/mntas the mount point. The/mntdirectory is often reserved for temporary disks in cloud platforms (like Azure or AWS), which may be cleared during reboots or system updates. Instead, use a custom directory such as/dataor/storage.Example:
sudo mkdir /data
- Mount the Partition:
Mount the formatted partition to the newly created directory:
sudo mount /dev/sdX1 /data
- Persist the Mount:
To ensure the partition is automatically mounted on boot, add it to the/etc/fstabfile:
echo '/dev/sdX1 /data ext4 defaults 0 2' | sudo tee -a /etc/fstab
Persisting the Mount: Use UUID in Cloud Environments
To ensure the partition is automatically mounted on boot, adding it to the /etc/fstab file is essential. However, in cloud environments, it is recommended to use the UUID (Universally Unique Identifier) for mounting disks instead of directly referencing the device name (e.g., /dev/sdX1). Device names can change after a system reboot, especially in virtualized or cloud environments, potentially leading to mount failures. Using UUID ensures consistent and reliable mounting.
Steps to Persist the Mount Using UUID
- Find the UUID of the Partition:
Use theblkidcommand to retrieve the UUID of the partition:
sudo blkid
- Example output:
/dev/sdX1: UUID="123e4567-e89b-12d3-a456-426614174000" TYPE="ext4"
- Edit the
/etc/fstabFile:
Add an entry to the/etc/fstabfile using the UUID instead of the device name.
Example:echo 'UUID=123e4567-e89b-12d3-a456-426614174000 /data ext4 defaults 0 2' | sudo tee -a /etc/fstab - Verify the Configuration:
Test the configuration by unmounting the partition and remounting it using themount -acommand:
sudo umount /data
sudo mount -a
- Reboot and Confirm:
Reboot the system to ensure the disk is mounted correctly during startup:sudo reboot
Why Use UUID in Cloud Environments?
- Consistency: Device names like
/dev/sdXmay change after a reboot due to dynamic device enumeration in cloud platforms. - Reliability: UUIDs are unique to each partition and remain constant, ensuring reliable mounting.
- Best Practice: Cloud providers like AWS, Azure, and Google Cloud recommend using UUIDs or labels for mounting disks in production environments.
Cloud and Virtualization Scenarios: Disk Expansion and Initialization
Scenario 1: OS Disk Expansion
In cloud platforms like AWS, Azure, or Google Cloud, OS disks can be expanded from the physical layer. Many platforms automatically detect and expand the OS disk. However, manual intervention may be required to resize the file system to utilize the new space.
Steps to Expand OS Disk on Ubuntu Server:
- Check Disk Space:
Verify the expanded disk space usinglsblk:lsblk - Resize the File System:
Useresize2fsfor Ext4 file systems:sudo resize2fs /dev/sdX1
Scenario 2: Data Disk Initialization, please see previous section
Monitoring and Optimizing Disk Usage
Monitoring Disk Usage
- Check Disk Space Usage:
Use thedfcommand to display disk space usage:df -h - Analyze Directory Usage:
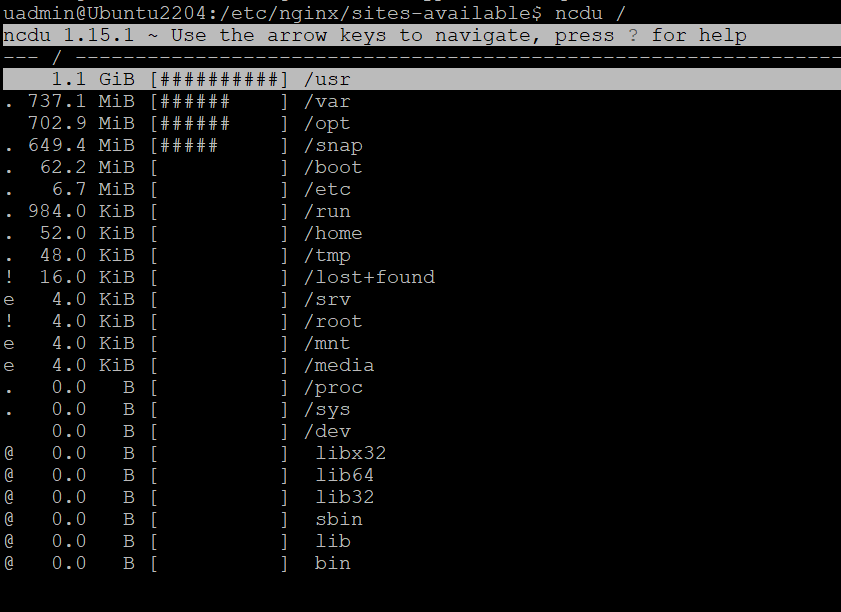
Use theducommand to check the size of specific directories:du -sh /var/log - Advanced Monitoring:
Installncdufor interactive disk usage analysis:
sudo apt install ncdu
ncdu /
Optimizing Disk Usage
- Remove Temporary Files:
sudo apt-get autoclean
sudo apt-get clean
sudo apt-get autoremove
- Find Large Files Consuming Disk Space
Locate large files using thefindcommand:
sudo find / -type f -size +100M
References
In the next article, we will dive into Setting Up a Database Server on ubuntu servers. You’ll learn how to:
- Install and configure MySQL or MariaDB for your applications.
- Secure your database server to protect sensitive data.
- Optimize database performance for production environments.
Whether you’re deploying databases in the cloud or on-premises, this guide will provide actionable insights to help you effectively manage your database infrastructure.
Don’t miss it—stay tuned!
5 thoughts on “15. Managing Storage and Disks on Ubuntu Server: Simple Guide”