ComfyUI is a highly customizable open-source tool for image generation, offering advanced workflows through its modular design. One of its standout features is the ability to extend its functionality using custom nodes, which are user-created modules designed to add new features or enhance existing ones. In this guide, we’ll walk you through the process of installing custom nodes in ComfyUI, using the popular rgthree-comfy node package as an example.
Table of Contents
Why Install Custom Nodes in ComfyUI?
Custom nodes allow you to:
- Expand ComfyUI’s capabilities beyond its default features.
- Introduce advanced functionality, such as enhanced seed control, metadata integration, or specialized workflows.
- Tailor your experience to meet specific needs, whether for creative exploration or precise, repeatable results.
For this tutorial, we’ll demonstrate the installation process using rgthree-comfy, a powerful custom node package that provides intuitive seed control and other workflow enhancements.
Step-by-Step Guide to Installing Custom Nodes
1. Identifying Missing Nodes
When opening a workflow that requires custom nodes not yet installed, ComfyUI will display missing nodes in bright red. This helps users quickly identify which nodes need to be added.

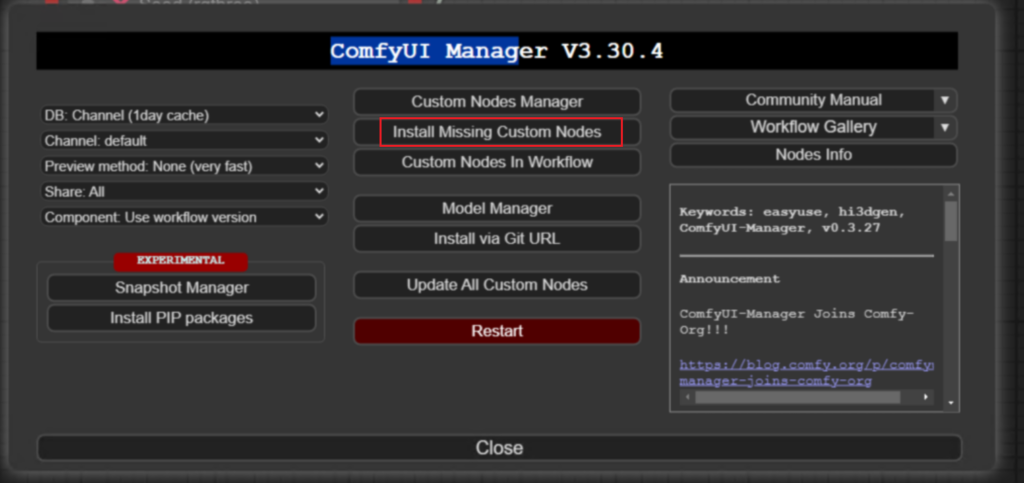
2. Launching the Custom Nodes Manager
To install missing nodes:
- Open the Custom Nodes Manager from the ComfyUI interface.
- Use the filter dropdown to select “Missing,” which lists all nodes required for the current workflow.
3. Downloading and Installing Nodes
You can install nodes directly from the manager:
- Click on the missing node package (e.g., rgthree’s ComfyUI nodes).
- Follow the link to the GitHub repository or simply click the Install button within ComfyUI. This automates the download and installation process.


Then restart the User Interface.
Alternatively, you can:
- Download the node package as a ZIP file from GitHub.
- Extract the contents and place them in the
custom_nodesfolder within the ComfyUI installation directory. - Restart ComfyUI to load the newly installed nodes.
Furthermore, just bring the key features of the rgthree-comfy Node here for your awareness.
Random Seed: Set the seed value to -1 for a new random seed with every generation.
Fixed Seed: Use a specific number for consistent results.
Seed Recycling: Reuse the last queued seed with a single click.
Metadata Integration: Automatically stores seed values in image metadata for easy reuse.
Increment/Decrement Seeds: Use -2 to increment or -3 to decrement the last seed value.
General Tips for Installing and Using Custom Nodes
Finding Custom Nodes
- Search GitHub repositories or community forums for custom nodes tailored to your needs.
- Verify compatibility with your version of ComfyUI.
Installing from ZIP Files
If a custom node is provided as a ZIP file:
- Extract its contents into the
custom_nodesdirectory. - Restart ComfyUI after extraction.
Troubleshooting
- If a node doesn’t appear in ComfyUI, ensure it’s placed in the correct directory.
- Review the node’s documentation for additional installation steps or dependencies.
Updating Custom Nodes
To update a custom node:
- Navigate to its directory:
cd ComfyUI/custom_nodes/<node_directory> - Pull the latest changes:
git pull - Restart ComfyUI after updating.
Conclusion
Custom nodes are a game-changer for ComfyUI users, offering advanced features and workflow customization. By following this guide, you can install and configure custom nodes like rgthree-comfy to unlock new possibilities in image generation. Whether you’re a creative professional or a technical enthusiast, custom nodes empower you to achieve precise and repeatable results.