Introduction
Image-to-image transformation is a powerful technique used in AI-driven generative models to modify or enhance images by converting them into a latent space and applying diffusion processes. Unlike starting from noise, this approach allows users to work with existing images, enabling transformations that respect the original content while incorporating stylistic changes. This article explains how to set up an image-to-image workflow in ComfyUI and explores key parameters like denoise values to achieve optimal results.

Table of Contents
What Is Image-to-Image Transformation?
Image-to-image transformation leverages a Variational Autoencoder (VAE) to encode an image into latent space, where modifications can be applied using diffusion techniques. The latent image is then decoded back into pixel space, producing a new image that reflects the applied changes. This method is particularly useful for tasks such as style transfer, image restoration, and creative modifications.
Setting Up the Workflow in ComfyUI
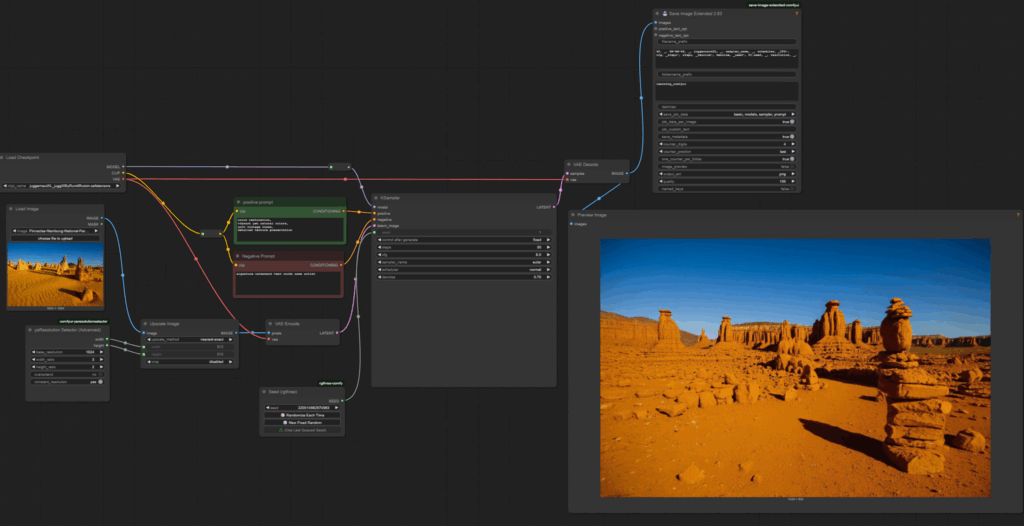
To create an image-to-image workflow in ComfyUI, follow these steps:
Step 1: Load the Image
- Add a Load Image Node:
- Double-click in the ComfyUI interface and type
LOAD. - Select the Load Image Node.
- Click to upload your image file.
- Navigate to the desired image file and click Open. The image will be copied to the ComfyUI input folder.
- Double-click in the ComfyUI interface and type
- Verify the image location:
- Check the ComfyUI installation directory under the
inputfolder. - Periodically clear out old files to maintain organization.
- Check the ComfyUI installation directory under the
Step 2: Scale the Image
Most generative models require images to fit specific resolution parameters. To resize the image:
- Add an Upscale Image Node:
- Double-click and type
UPSCALE. - Select the Upscale Image Node.
- Connect this node between the Load Image Node and the VAE Encode Node.
- Double-click and type
- Set resolution parameters:
- Add a Resolution Selector Node.
- Convert the width and height widgets to inputs by right-clicking on them.
- Specify the desired width and height values.
Step 3: Encode the Image into Latent Space
- Add a VAE Encode Node:
- Double-click and type
VAE. - Select the VAE Encode Node.
- Connect the latent output of this node to the latent image input of the K-Sampler Node.
- Double-click and type
- Ensure the model checkpoint provides the required VAE.
Step 4: Configure Sampler Parameters
The K-Sampler Node allows you to control key parameters for the diffusion process:
- Steps: Increase the number of steps for better quality (e.g., 30 steps).
- CFG Scale: Set the classifier-free guidance scale (e.g., 8.0) to balance adherence to the prompt and the latent image.
- Sampler Type: Use
Eulerfor consistent results. - Denoise Strength: Adjust the denoise value to control how much noise is added and removed during the diffusion process.
Understanding Denoise Values
The denoise strength parameter determines how much the original image is altered during the diffusion process. Here’s a breakdown of the results based on different denoise values:
- 1.00: Completely replaces the original image with generated content. This is ideal for creating entirely new images based on the style prompt.
- 0.5: Balances the original image with stylistic modifications. This is useful for preserving key features while applying artistic changes.
- 0.2: Minimally alters the original image, ensuring high fidelity to the input image while applying subtle stylistic enhancements.
- 0.0: Essentially reproduces the original image, with minor variations due to the encoding and decoding process.
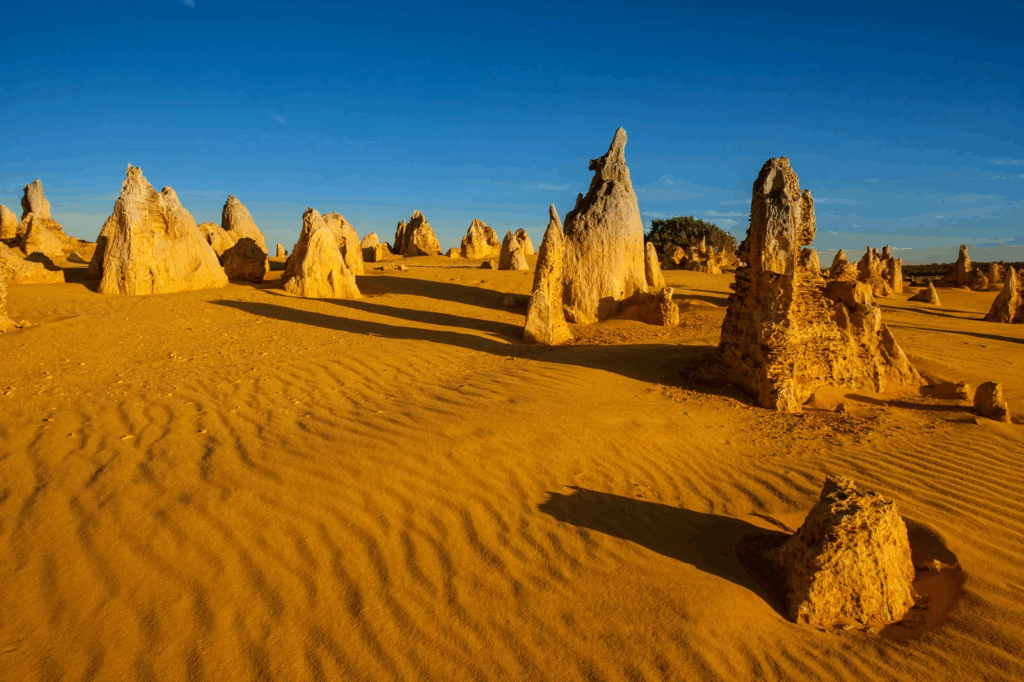
Example Results
Using an image of Pinnacles as input, the following results were observed:
Original Image:
- Denoise 1.00: Generated a completely new image.
- Denoise 0.5: Produced a painting-like version of Pinnacles , but with slight deviations from the original photo.
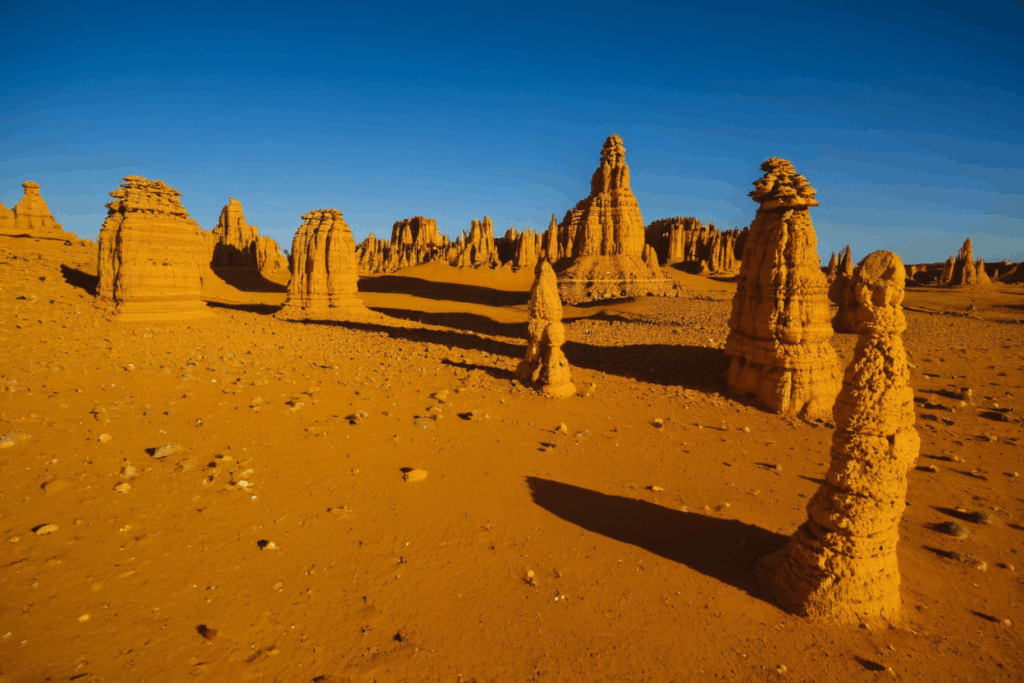
- Denoise 0.2: Achieved a close match to the input image while respecting the style prompt.

- Denoise 0.0: Reproduced the original photo, though slightly diffused due to latent space processing.
Tips for Optimal Results
- Choose the Right Denoise Value:
- For significant transformations: Use values closer to 1.00.
- For subtle changes: Use values between 0.2 and 0.5.
- To preserve the original image: Use values near 0.0.
- Refine Your Prompt:
- Specify style instructions clearly.
- Avoid including content-related instructions if you want the original image to dominate.
- Monitor Training Data Bias:
- Be aware that training datasets may influence the output. For example, common perspectives in training data can override unique features of your input image.
Comparing the Original and Final Image
After processing the image of Pinnacles with a denoise value of 0.2, the result closely matched the original photo while applying artistic enhancements. This demonstrates the effectiveness of image-to-image transformation in blending style prompts with input images.
Conclusion
Image-to-image transformation in ComfyUI offers a flexible and powerful way to modify images using latent space diffusion. By carefully configuring nodes and parameters, users can achieve results ranging from subtle enhancements to complete transformations. Adjusting the denoise value is key to balancing the original image with stylistic modifications.
2 thoughts on “C20: Mastering Image-to-Image Transformation in ComfyUI”