Introduction
Expanding a Windows OS disk may sometimes be hindered by the presence of a healthy recovery partition. This partition occupies space on the disk, preventing the expansion of the C: drive. This article provides step-by-step instructions to safely remove the recovery partition and extend the OS disk.
Impact of Deleting the Recovery Partition
While deleting the recovery partition can free up disk space, it has significant implications:
Loss of Factory Reset Capability
Once the recovery partition is deleted, you lose the ability to use built-in tools to restore the system to its factory settings. This can be problematic for users who rely on the recovery partition for quick troubleshooting or system restoration.
No Access to Recovery Tools
The recovery tools stored in the partition, including the Winre.wim file, will no longer be available. This means you cannot access advanced recovery options without external recovery media or backups.
Alternatives to Preserve Recovery Options
Before deleting the recovery partition, consider the following alternatives to ensure recovery capabilities are maintained:
1. Create a System Backup
Use Windows Backup or third-party tools like Macrium Reflect or Acronis True Image to create a full system image. This allows you to restore your system to its current state if needed, even without a recovery partition.
2. Export the Recovery Partition
Some tools, such as the Windows Recovery Media Creator, allow you to export the recovery partition to an external drive or USB. This ensures you retain access to recovery tools even after deleting the partition.
3. Use Cloud-Based Recovery Options
In cloud environments, such as Azure Virtual Machines, recovery partitions are less critical because cloud providers offer robust backup and recovery solutions. For example:
- VM Backups: Regular backups of virtual machines can be configured in the cloud provider’s portal.
- Snapshot Recovery: Virtualization solutions like VMware, Hyper-V, and cloud platforms provide snapshot-based recovery options, allowing you to roll back to a previous state quickly.
Why the Recovery Partition Is Less Important in Cloud Environments
In cloud or virtualized environments, the recovery partition is not as essential because there are built-in mechanisms to back up and recover virtual machines. These solutions often include automated backups, snapshots, and disaster recovery options, making the recovery partition redundant for most users.
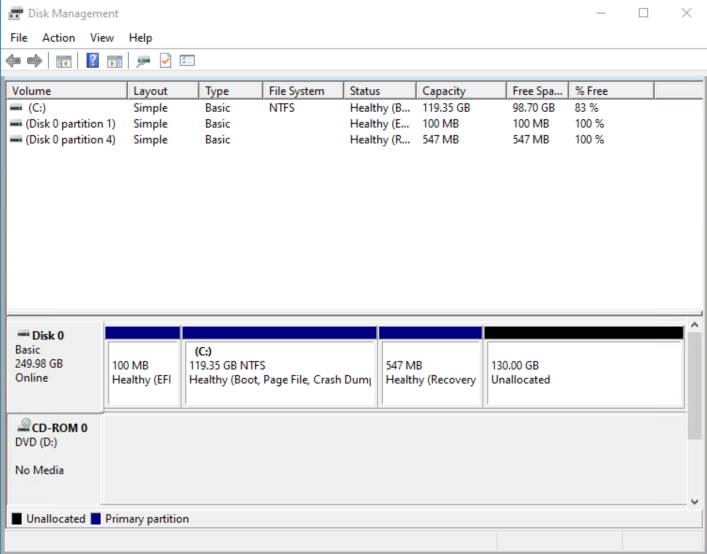
Step-by-Step Guide to Expand a Windows 10 OS Disk
Prerequisites
Before proceeding, ensure you have administrative privileges on the machine. Removing the recovery partition will disable the ability to restore the system to factory settings using that partition. Consider creating a full system backup or using third-party tools for recovery purposes.
Step 1: Open Diskpart
Diskpart is a built-in Windows utility for managing disks and partitions.
- Press Win + R to open the Run dialog box.
- Type
diskpartand press Enter. - Click Yes on the User Account Control (UAC) prompt.
Step 2: List and Select the Disk
Identify the disk containing the C: drive.
- In the Diskpart console, type the following command:
list diskThis will display all available disks on the system. - Select the disk containing the C: drive (usually Disk 0):
select disk XReplaceXwith the disk number (e.g.,select disk 0).

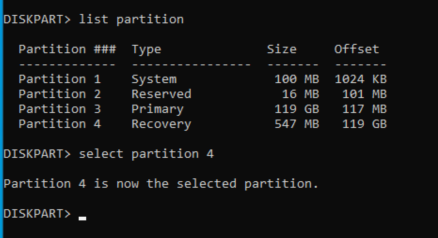
Step 3: List and Select the Partition
Identify the recovery partition on the selected disk.
- Type the following command to list all partitions on the selected disk:
list partitionThis will display all partitions, including the recovery partition. - Select the recovery partition:
select partition XReplaceXwith the partition number corresponding to the recovery partition (e.g.,select partition4 based on the screenshot).
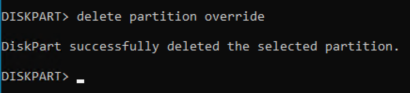
Step 4: Delete the Recovery Partition
Once the recovery partition is selected, delete it using the following command:
delete partition override
The override parameter ensures the partition is deleted even if it is marked as protected.
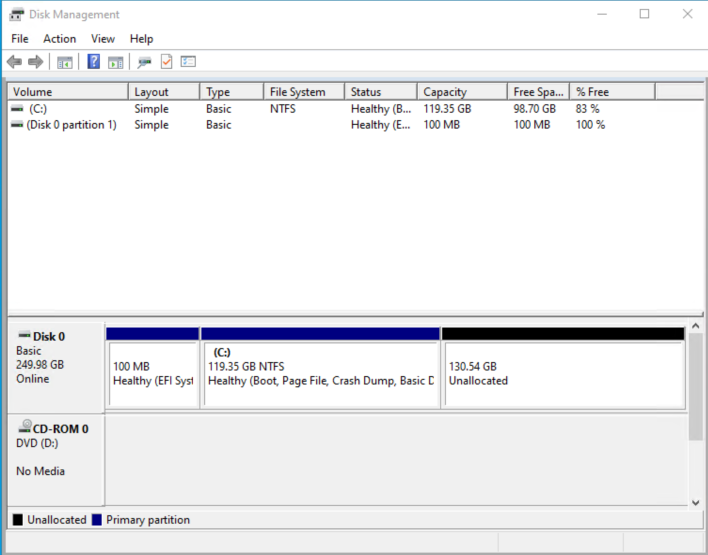
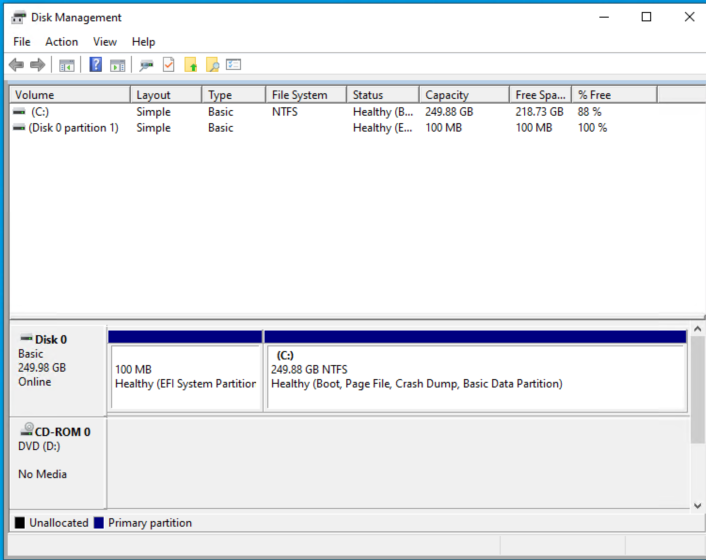
Step 5: Extend the C: Drive
After deleting the recovery partition, you can now expand the C: drive. Follow the instructions provided in the official Microsoft documentation to extend the OS disk:
Expand OS Disk on Windows Virtual Machines
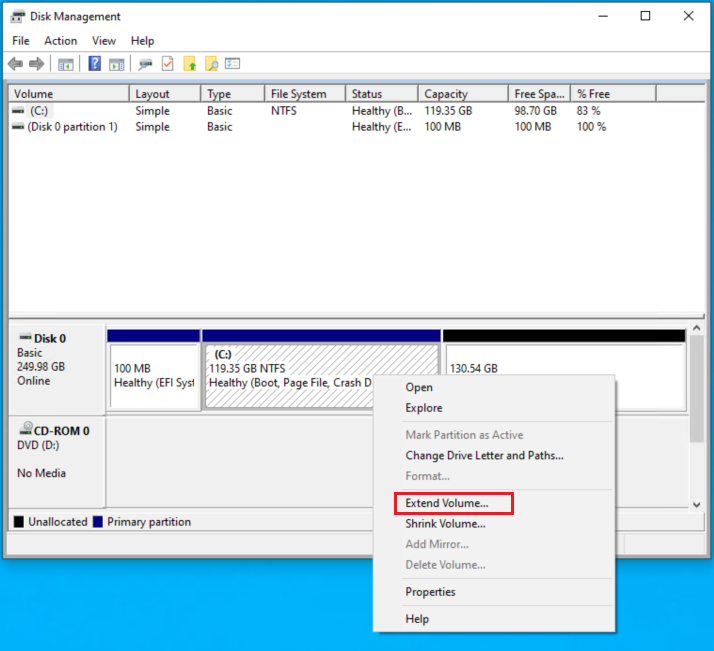
Follow the instructions to extend, then it will be successfully expanded.
Additional Notes
- Azure Virtual Machines: If you are working with Azure VMs, ensure the disk is resized in the Azure portal before attempting to extend the OS disk within the VM. Refer to the Azure documentation for detailed instructions.
- On-Premises Systems: For physical or on-premises systems, ensure you have proper backups before deleting partitions.