Introduction
Setting up and managing servers manually can be a tedious and error-prone process, especially in environments with multiple servers or repetitive configuration tasks. Ansible, a powerful open-source IT automation tool, streamlines this process by enabling you to automate server provisioning, configuration, and management with ease. In this guide, “24. Automating Ubuntu Server Setup with Ansible: A Practical Guide,” we’ll walk you through the basics of using Ansible to automate the setup and configuration of Ubuntu Server. By the end, you’ll learn how to write and execute Ansible playbooks to simplify common server tasks, improve efficiency, and ensure consistency across your infrastructure.
Previous articles:
01. Introduction to Ubuntu Server – SysOSX: AI & Cloud
02. How to Setup Your First Ubuntu Server: A Beginner’s Guide – SysOSX: AI & Cloud
03.Mastering the Linux Command Line for Ubuntu Server – SysOSX: AI & Cloud
04. Managing Users and Permissions on Ubuntu Server: A Comprehensive Guide – SysOSX: AI & Cloud
05. Networking Basics for Ubuntu Server: A Comprehensive Guide – SysOSX: AI & Cloud
06. Installing and Managing Software on Ubuntu Server: A Complete Guide – SysOSX: AI & Cloud
07.Patching and Updating Ubuntu Server: A Comprehensive Guide – SysOSX: AI & Cloud
08. Securing Your Ubuntu Server: Practical Steps for Hardening and Protection – SysOSX: AI & Cloud
09. Ubuntu server auditing and logging
10. System Monitoring Tools for Ubuntu Server: A Comprehensive Guide – SysOSX: AI & Cloud
11. Centralized Logging for ubuntu server: a must read guide – SysOSX: AI & Cloud
12. Audit and Compliance for Ubuntu Server: Best Practices – SysOSX: AI & Cloud
14. Host Multiple Websites on a single Ubuntu Server: Useful tips – SysOSX: AI & Cloud
15. Managing Storage and Disks on Ubuntu Server: Simple Guide – SysOSX: AI & Cloud
16. Setting Up File Sharing Services on Ubuntu Server: a complete guide – SysOSX: AI & Cloud
17. Setting Up a Secure Database Server on Ubuntu: MySQL vs. MariaDB – SysOSX: AI & Cloud
18. How to Configure and Use LVM on Ubuntu Server: A Comprehensive Guide – SysOSX: AI & Cloud
21. Getting Started with LXD: Install Containers with Ease + Cheat Sheet – SysOSX: AI & Cloud
22. Getting Started with Podman on Ubuntu Server: A complete guide – SysOSX: AI & Cloud
23. Deploying Ubuntu Server in the Cloud: A Step-by-Step Guide – SysOSX: AI & Cloud
Table of Contents
Why Use Ansible for Server Automation?
Ansible is widely used for server automation because of its simplicity and power. Here’s why it’s a top choice:
- Agentless: Ansible doesn’t require any agent software to be installed on the target servers. It uses SSH for communication.
- Declarative Syntax: Ansible playbooks use YAML, a human-readable syntax, making it easy to define desired states.
- Reusable Configurations: Write playbooks once and reuse them across multiple servers.
- Idempotent: Ansible ensures tasks are only executed if necessary, avoiding redundant operations.
- Extensibility: Ansible supports a wide range of modules to handle tasks like package installation, file management, and service configuration.
Prerequisites
Before we dive into automating Ubuntu Server setup with Ansible, ensure you have the following:
- Control Node: A machine (your local system or a dedicated server) where Ansible is installed.
- Target Servers: Ubuntu Servers (on-premises or in the cloud) that you want to configure.
- SSH Access: Ensure passwordless SSH access is set up between the control node and the target servers.
Step 1: Install Ansible
1.1 Install Ansible on the Control Node
On your control node (e.g., your local machine running Ubuntu), install Ansible:
sudo apt update
sudo apt install ansible -y
1.2 Verify Installation
Check the installed version of Ansible to ensure it’s installed correctly:
ansible --version
Example output:
ansible 2.10.8
  config file = None
  configured module search path = ['/home/uadmin/.ansible/plugins/modules', '/usr/share/ansible/plugins/modules']
  ansible python module location = /usr/lib/python3/dist-packages/ansible
  executable location = /usr/bin/ansible
  python version = 3.10.12 (main, Feb  4 2025, 14:57:36) [GCC 11.4.0]
Step 2: Set Up SSH Access
Ansible communicates with target servers over SSH. You’ll need to set up passwordless SSH access from the control node to the target servers.
2.1 Generate an SSH Key Pair
If you don’t already have an SSH key pair, generate one:
ssh-keygen -t rsa -b 2048
2.2 Copy the SSH Key to Target Servers
Use the following command to copy your public key to the target server(s):
ssh-copy-id ubuntu@<target-server-ip>
Test SSH access to ensure it works without a password:
ssh ubuntu@<target-server-ip>
Step 3: Define Your Inventory
Ansible uses an inventory file to define the target servers you want to manage.
3.1 Create an Inventory File
Create a file named inventory in your working directory:
nano inventory
Add the IP addresses or hostnames of the target servers. For example:
[ubuntu_servers]
192.168.50.42
192.168.50.145
Save and exit the file (Ctrl+O, then Ctrl+X).
3.2 Test Connectivity
Use the ping module to test connectivity to the target servers:
ansible -i inventory ubuntu_servers -m ping
Example output:
192.168.50.145 | SUCCESS => {
    "ansible_facts": {
        "discovered_interpreter_python": "/usr/bin/python3"
    },
    "changed": false,
    "ping": "pong"
}
192.168.50.42 | SUCCESS => {
    "ansible_facts": {
        "discovered_interpreter_python": "/usr/bin/python3"
    },
    "changed": false,
    "ping": "pong"
}
Step 4: Write Your First Ansible Playbook
Ansible playbooks are YAML files that define the tasks you want to automate. Let’s create a playbook to automate the setup of an Ubuntu Server.
4.1 Create a Playbook File
Create a file named setup.yml:
nano setup.yml
4.2 Define the Playbook
Add the following content to the playbook:
---
- name: Configure Ubuntu Server
  hosts: ubuntu_servers
  become: true

  tasks:
    - name: Update and upgrade apt packages
      apt:
        update_cache: yes
        upgrade: dist

    - name: Install common packages
      apt:
        name:
          - curl
          - wget
          - git
          - build-essential
        state: present

    - name: Enable UFW and allow SSH
      ufw:
        rule: allow
        name: OpenSSH
        state: enabled

    - name: Create a new user
      user:
        name: devuser
        password: "{{ 'password123' | password_hash('sha512') }}"
        state: present
        groups: sudo
Explanation of Tasks
- Update and Upgrade Packages: Ensures the server has the latest updates and security patches.
- Install Common Packages: Installs essential tools like
curl,wget, andgit. - Enable UFW: Configures the firewall to allow SSH access.
- Create a New User: Adds a new user with sudo privileges.
- Set Hostname: Configures the server’s hostname.
Save and exit the file.
Step 5: Run the Playbook
Execute the playbook to apply the configurations:
ansible-playbook -i inventory setup.yml
Ansible will log the progress of each task. If all tasks complete successfully, your Ubuntu Server will be fully configured.
Output Below:
uadmin@u2204-001:~$ sudo ansible-playbook -i inventory setup.yml

PLAY [Configure Ubuntu Server] ***************************************************************************************

TASK [Gathering Facts] ***********************************************************************************************
ok: [192.168.50.145]
ok: [192.168.50.42]

TASK [Update and upgrade apt packages] *******************************************************************************
^X^C [ERROR]: User interrupted execution
uadmin@u2204-001:~$ sudo nano setup.yml
uadmin@u2204-001:~$ sudo ansible-playbook -i inventory setup.yml

PLAY [Configure Ubuntu Server] ***************************************************************************************

TASK [Gathering Facts] ***********************************************************************************************
ok: [192.168.50.145]
ok: [192.168.50.42]

TASK [Update and upgrade apt packages] *******************************************************************************
ok: [192.168.50.42]
ok: [192.168.50.145]

TASK [Install common packages] ***************************************************************************************
changed: [192.168.50.145]
changed: [192.168.50.42]

TASK [Enable UFW and allow SSH] **************************************************************************************
changed: [192.168.50.145]
changed: [192.168.50.42]

TASK [Create a new user] *********************************************************************************************
changed: [192.168.50.42]
changed: [192.168.50.145]

PLAY RECAP ***********************************************************************************************************
192.168.50.145             : ok=5    changed=3    unreachable=0    failed=0    skipped=0    rescued=0    ignored=0
192.168.50.42              : ok=5    changed=3    unreachable=0    failed=0    skipped=0    rescued=0    ignored=0
Step 6: Verify the Configuration
6.1 Check Installed Packages
Log in to one of the target servers and verify that the common packages were installed:
curl --version
git --version
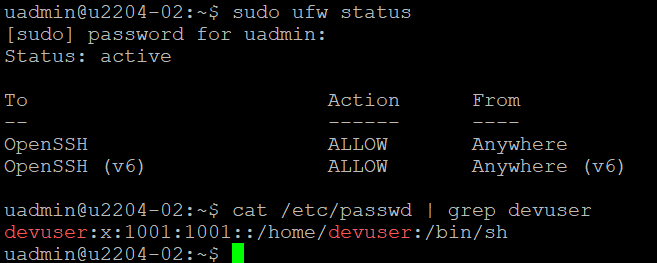
6.2 Check Firewall Status
Verify that the firewall is enabled:
sudo ufw status
6.3 Check New User
Ensure the new user was created:
cat /etc/passwd | grep devuser
Advanced Use Cases
Once you’re comfortable with basic playbooks, you can explore more advanced use cases:
- Deploying Applications: Use Ansible to install and configure web servers (e.g., Nginx, Apache) or databases (e.g., MySQL, PostgreSQL).
- Managing Multiple Environments: Create separate inventory files for staging, production, and development environments.
- Using Roles: Organize your playbooks into reusable roles for complex setups.
- Integrating with CI/CD: Automate server setup as part of your CI/CD pipeline.
Reference:
Ansible Documentation — Ansible Community Documentation
Conclusion
Ansible is a powerful tool for automating server setup and configuration. In this guide, we covered:
- Installing Ansible on the control node.
- Setting up SSH access to target servers.
- Writing and executing a basic playbook to automate Ubuntu Server setup.
By leveraging Ansible, you can save time, reduce errors, and ensure consistency across your infrastructure. Whether you’re managing a single server or hundreds, Ansible is an essential tool for modern DevOps workflows.
2 thoughts on “24. Automating Ubuntu Server Setup with Ansible: A Practical Guide”