Introduction
The SDXL model offers powerful capabilities for image generation and refinement, making it a popular choice for creative workflows. In this article, we’ll explore how to set up the full SDXL workflow using both the base model and the refiner model. By leveraging these models effectively, you can produce high-quality images with improved details and artistic effects.
For your convenience, download the models here:
- SDXL Base Model: Download from Hugging Face
- SDXL Refiner Model: Download from Hugging Face
After downloading the model, put it in folder “C:\Users\<username>\Documents\ComfyUI\models\checkpoints”
Table of Contents
What Is SDXL?
The Stable Diffusion XL (SDXL) model represents a significant advancement in the field of image generation using AI. Developed by Stability AI, this model builds on the success of earlier Stable Diffusion versions by introducing enhanced capabilities for generating ultra-realistic, high-resolution images.
Key Features of SDXL:
- Two-Stage Workflow: SDXL is designed to work with two models:
- Base Model: Responsible for generating the initial image with foundational features, textures, and compositions.
- Refiner Model: Further enhances the generated image by refining details, improving textures, and adding artistic effects.
- Higher Resolution Outputs: SDXL supports resolutions up to 1024×1024 pixels, making it ideal for creative projects requiring detailed and high-quality images.
- Improved Prompt Understanding: The model excels at interpreting complex prompts, allowing users to create highly customized outputs that align with their creative vision.
- Noise Management: SDXL incorporates advanced techniques for managing noise during image generation, enabling smoother transitions between the base and refiner stages.
- Versatility Across Styles: Whether you’re aiming for photorealism, abstract art, or stylized outputs, SDXL adapts to various artistic styles with remarkable flexibility.
Why Use SDXL?
SDXL is particularly useful for workflows that require both creativity and precision. By combining the base model with the refiner model, users can achieve results that are not only visually stunning but also highly customizable. This makes SDXL an excellent choice for professionals in fields like digital art, graphic design, and visual storytelling.
Setting Up the SDXL Workflow
Step 1: Configuring the Base Model
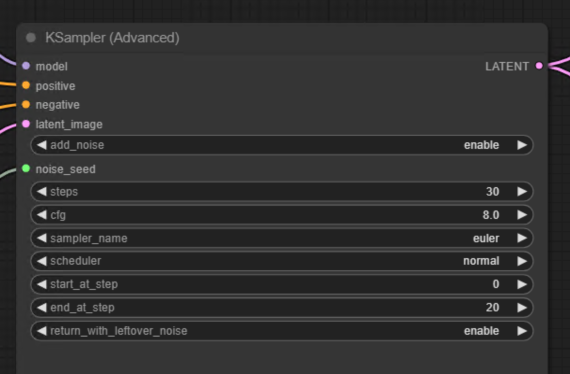
Begin by loading the SDXL Base 1.0 checkpoint into your workflow. Use a K Sampler Advanced Node to refine the image generation process.
- Add Noise: Enable noise addition for the base model to perform the ordinary diffusion process.
- Steps Configuration: Set the total steps to 30. However, leave some noise for the second sampler node to refine later.
- Enable Return with Leftover Noise: This ensures that some noise remains in the latent space for the refiner model to process.
Parameters to Set:
- Add Noise: Enable
- End at Step: 20 (out of 30)
- Return with Leftover Noise: Enable
Run the workflow to generate an initial image. Save this image to disk for comparison later.
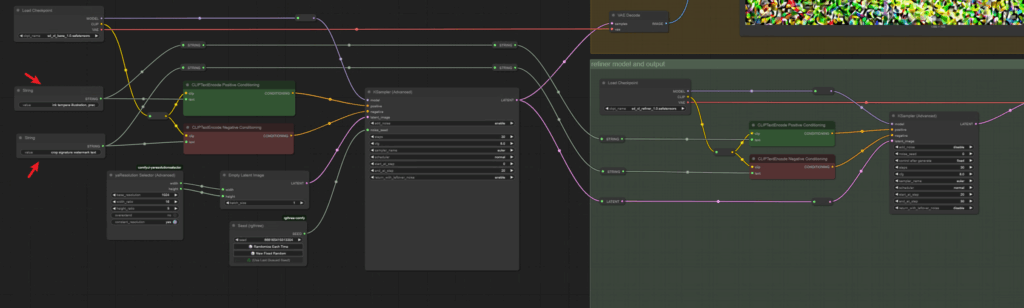
Step 2: Setting Up the Refiner Model
Once the base model has generated the initial image, it’s time to refine it using the SDXL Refiner Model.
- Load Checkpoint: Load the SDXL refiner model into your workflow.
- Disable Noise Addition: Since the image already contains noise from the base model, disable noise addition for the refiner model.
- Connect Nodes:
- Positive Conditioning: Connect the positive prompt to the refiner model.
- Negative Conditioning: Connect the negative prompt to the refiner model.
- Latent: Pass the latent space from the base model to the refiner model.
Parameters to Set:
- Add Noise: Disable
- Start at Step: 20
- End at Step: 30
- Control After Generate: Fixed

Step 3: Optimizing the Workflow
To streamline the process, use primitive nodes to pass prompts between the base and refiner models. This avoids duplicating the prompt manually and ensures consistency.
- Use a Primitive Node to route the positive and negative prompts to both models.
- Connect the prompts to the Clip Text Encode Conditioning Nodes for each model.
Step 4: Saving and Comparing Outputs
After refining the image, save the final output using a Save Image Extended Node. Update the metadata in this node to ensure the correct data is captured from the refiner model.
Metadata Update:
- Replace placeholders (e.g., hash marks) in the Save Image Extended Node with this ID.
Once saved, compare the outputs:
- Base Model Output: Contains noise and appears less detailed.

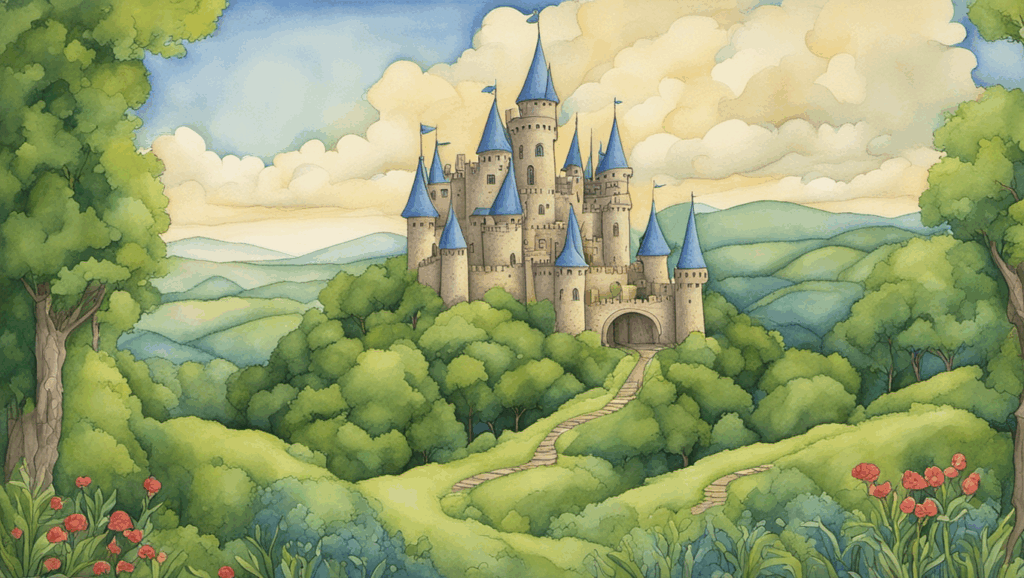
- Base + Refiner Model Output: Noise is removed, resulting in a polished image with enhanced watercolor effects and improved details.
Example Prompts for Reference
To achieve the best results, start with well-crafted prompts. Below are examples of positive and negative prompts you can use:
Positive Prompt:
A fantasy castle surrounded by lush greenery, intricate architectural details, vibrant colors, and a glowing sunrise in the background, watercolor style, ultra-realistic, 4K resolution
Negative Prompt:
Blurry, low-quality, distorted, overexposed, grainy, unrealistic proportions, poorly lit, low resolution
These prompts can be customized to suit your creative vision.
Key Parameters in K Sampler Advanced Node
Below is a summary of the key parameters used in the K Sampler Advanced Node for both models:
| Parameter | Base Model | Refiner Model |
|---|---|---|
| Add Noise | Enabled | Disabled |
| End at Step | 20 | 30 |
| Return with Leftover Noise | Enabled | N/A |
| Control After Generate | N/A | Fixed |
Benefits of Using SDXL Base and Refiner Models
By combining the base and refiner models in your workflow, you can achieve:
- Higher Image Quality: The refiner model removes residual noise, enhancing details.
- Improved Artistic Effects: Better textures and color blending for creative outputs.
- Workflow Efficiency: Using primitive nodes and routing prompts reduces manual input errors.