Stable Diffusion has revolutionized image generation by operating in the latent space rather than the pixel space, providing users with unparalleled flexibility and control. One particularly powerful technique enabled by this framework is daisy-chaining samplers, a method that allows you to refine image fidelity and prompt adherence while preserving the desired composition. In this article, we’ll explore the concept of daisy-chaining samplers, its practical application, and how it can be leveraged to improve your Stable Diffusion workflows.
Table of Contents
What is Daisy-Chaining Samplers?
Daisy-chaining samplers refers to the process of connecting the latent output of one sampler to the latent input of another sampler. This technique enables iterative refinement of an image, allowing you to maintain the composition generated by the first sampler while improving details, color accuracy, and adherence to prompts through additional sampling steps.
Key Benefits of Daisy-Chaining Samplers:
- Improved Prompt Adherence: Achieve better alignment with your desired image description.
- Enhanced Fidelity: Add subtle details and refine textures without altering the core composition.
- Customizable Refinement: Control the level of noise removal and addition using the denoise parameter.
Practical Example: Refining a Mountain Lake Scene
Let’s apply the concept of daisy-chaining samplers to generate and refine an image based on the following prompt:
“A serene mountain lake surrounded by snow-capped peaks, vibrant autumn foliage, crystal-clear water reflecting the sky, and a wooden cabin on the shore.”
Initial Workflow Setup
We begin by using the following sampler configuration:
I am using model downloaded from : Realistic Vision V6.0 B1 – V5.1 (VAE) | Stable Diffusion Checkpoint | Civitai
- Sampler: DPM++ 2M
- Scheduler: Karras
- CFG Scale: 8
- Steps: 15
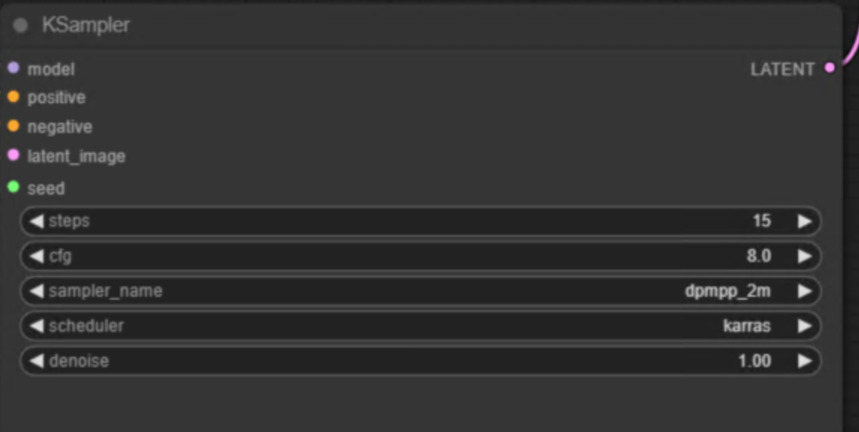
This setup is designed to quickly generate an image composition that matches the prompt. The result is promising but lacks certain details:
- The autumn foliage is muted and lacks vibrancy.
- The reflections in the lake are unclear.
- The wooden cabin is either missing or poorly defined.

Refining the Image: Increasing Steps vs. Daisy-Chaining
To enhance the image, one option is to increase the number of sampling steps. For example:
- Steps Increased to 40: While increasing steps improves fidelity and detail, it also alters the composition due to changes in the noise removal process. This happens because the amount of noise removed at each step impacts the image structure.

To avoid losing the original composition while enhancing details, we use daisy-chaining samplers.
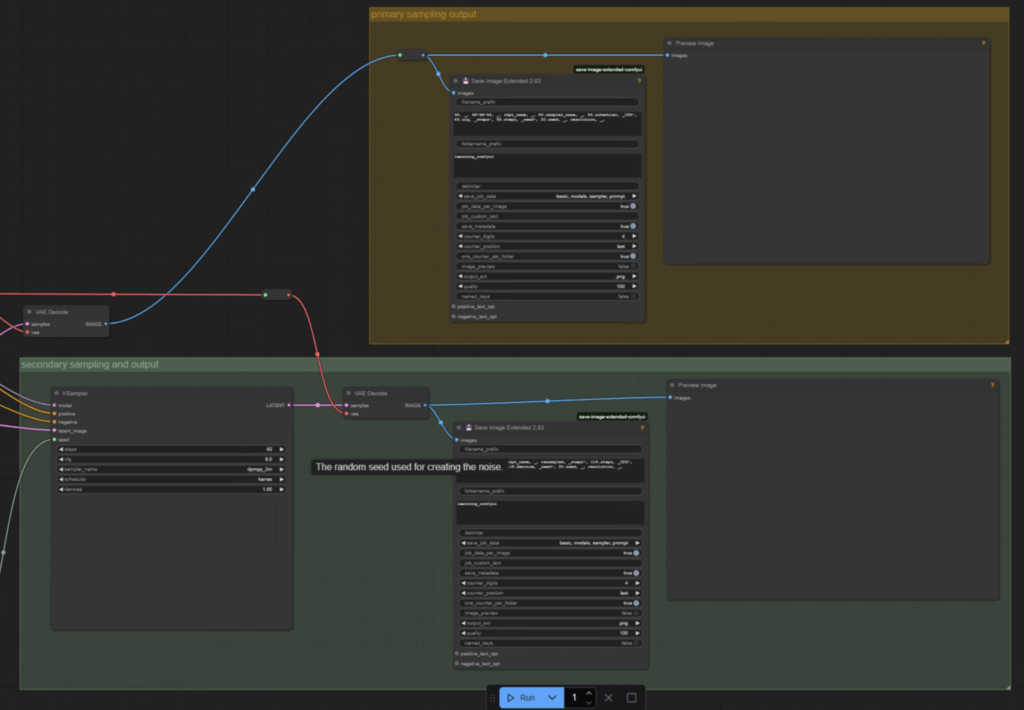
Setting Up a Daisy-Chained Workflow
Here’s how to implement daisy-chaining samplers for this prompt:
- Primary Sampler:
- Use the same prompt, seed, and sampler settings as before (15 steps).
- Generate the initial composition.
- Secondary Sampler:
- Feed the latent output from the primary sampler into the latent input of the secondary sampler.
- Use the same model, prompt, seed, and CFG scale.
- Increase the number of steps to 40 for finer refinement.
- Adjust the denoise parameter for optimal results.
Understanding the Denoise Parameter
The denoise parameter is critical for controlling how much noise is added and removed during the sampling process:
- Denoise = 1: Completely replaces the latent input, effectively discarding the original composition.

- Denoise < 1: Preserves the latent input while refining details. For this example, a denoise value of 0.75 ensures the original composition is retained while enhancing visual fidelity.

Final Results
By daisy-chaining the samplers and fine-tuning the denoise parameter, we achieve a refined image that closely aligns with the prompt:
- Vibrant Autumn Foliage: Enhanced colors and textures.
- Crystal-Clear Lake Reflections: Improved clarity and realism.
- Defined Wooden Cabin: Better adherence to the prompt and sharper details.
Comparing the initial image (20 steps) with the refined image (daisy-chained with 40 steps and denoise set to 0.75) highlights the effectiveness of this technique.
How to Implement Daisy-Chaining Samplers in Your Workflow
To incorporate daisy-chaining samplers into your Stable Diffusion workflow:
- Configure your primary sampler to establish the desired composition.
- Connect the latent output from the primary sampler to the latent input of a secondary sampler.
- Increase the steps in the secondary sampler for detailed refinement.
- Adjust the denoise parameter to balance composition preservation and fidelity enhancement.
Key Takeaways
Daisy-chaining samplers is a powerful tool for refining images generated in Stable Diffusion. By leveraging this technique, you can:
- Maintain the composition of your initial output.
- Enhance visual fidelity and details.
- Achieve better adherence to complex prompts.
Whether you’re creating landscapes, portraits, or abstract art, daisy-chaining samplers offers a flexible and effective method for achieving high-quality results.